Instagram DM Autoresponder
Turn your Instagram inbox into a 24/7 assistant. In this tutorial you'll build a flow that fires when someone DMs your Instagram Business account, has an Agent craft a reply, and sends it back to the sender's Instagram thread with the Instagram tool.
What you'll build: a bot that answers Instagram direct messages automatically — and steps aside gracefully when a human operator jumps in.
Nodes you'll use:
- Start with an Instagram trigger
- Agent — writes the reply
- Tool with the Instagram tool — sends it back to Instagram
Concepts to know:
- Triggers overview — how channel triggers work
- Manual mode — operator hand-off
This tutorial assumes your Instagram Business account is already connected to Flowera. Connecting the account (Business Login) is a one-time setup — see the Instagram trigger page for the prerequisites. Here we focus on building the flow.
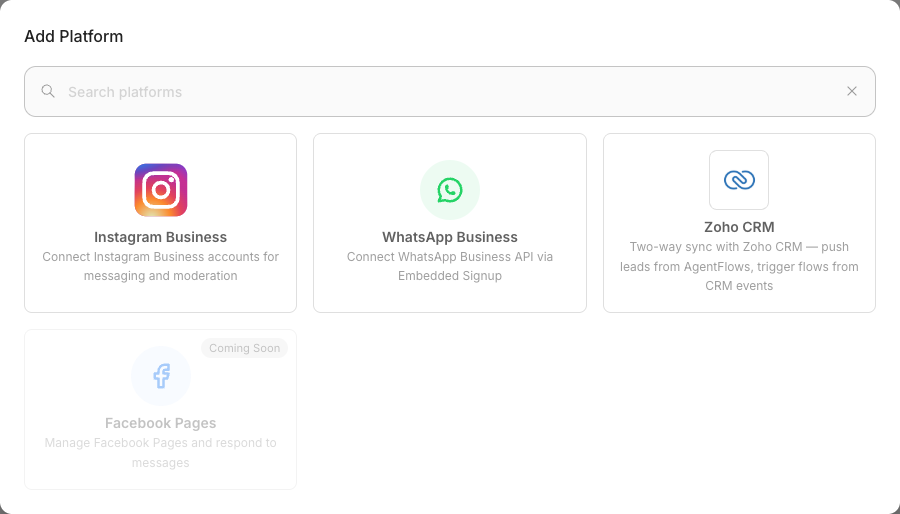
Where you connect it: open Credentials in the sidebar, switch to the Connected Accounts tab, and click Add Platform. Instagram Business and WhatsApp Business are both in that list, alongside Zoho CRM.
Step 1 — Add the Instagram trigger
Create a new AgentFlow and open the Start node. Instead of Chat Input, add an Instagram Business webhook trigger.
Configure it:
- Webhook Name — give it a clear name like
instagram-dm. This name is how you reference the trigger's data in variables ({{$webhook.instagram-dm.*}}), so pick it now and keep it consistent. - Instagram Account — pick your connected account.
- Instagram Events — turn on DM 💬 (you can also listen for Comments, Mentions, and Story Replies, but for an autoresponder you want DMs).
Meta channels like Instagram require the Workspace webhook mode (not Dedicated). The Instagram trigger page explains why and walks through it.
Step 2 — Understand what the trigger gives you
When a DM arrives, the flow starts with the message text available as {{$question}}, plus a set of Instagram-specific payload values. These live under the webhook's name — since we named ours instagram-dm, you reference them as {{$webhook.instagram-dm.<field>}}:
{{$webhook.instagram-dm.senderUsername}}— who messaged you{{$webhook.instagram-dm.eventType}}— the kind of event (a DM here){{$webhook.instagram-dm.senderId}},.recipientId,.timestamp
You'll use these to personalize the reply. (They are not under {{$flow.state.*}} — webhook payload fields live under {{$webhook.<name>.*}}; referencing them as flow state resolves to an empty string. The full payload list is on the Instagram trigger and Variables pages.)
Step 3 — Add the Agent
Add an Agent node and connect the Start node to it. Give it a System message tuned for social DMs — short, on-brand, emoji-friendly:
You are the Instagram assistant for Acme. Reply to DMs in a warm, casual, concise tone (1–3 sentences). The sender's handle is
{{$webhook.instagram-dm.senderUsername}}. Answer their question or point them to acme.com/shop. If they want to buy or need a human, tell them a teammate will follow up shortly.
Select a model as usual (see Models).
Step 4 — Send the reply with the Instagram tool
Writing the reply and delivering it are two different things. The Agent produced text; something still has to hand that text to Instagram. That something is the Instagram tool.
Add a Tool node, connect the Agent to it, and configure it:
- Tool — pick Instagram.
- Instagram Account — your connected account. If the flow has exactly one Instagram trigger, Flowera pre-selects the matching account.
- Operations — Send Direct Message.
- Tool Input Arguments — add one row:
- Input Argument Name:
messageDM - Input Argument Value:
{{ Agent }}— type{{and pick the Agent from the list.
- Input Argument Name:
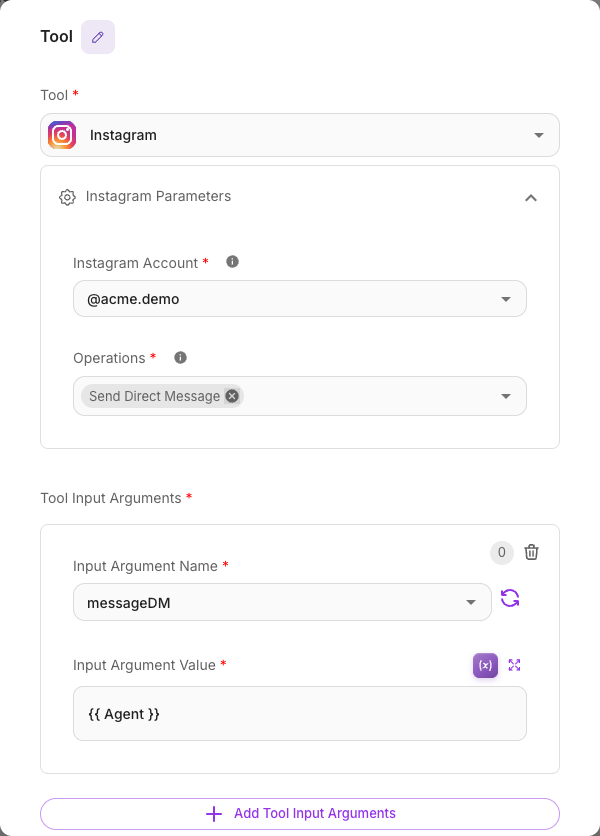
You don't need to fill in recipientId. The tool takes it from the trigger's payload — the person who DM'd you becomes the recipient of the reply.
Direct Reply writes into the Flowera conversation (the chat widget stream and the View Messages transcript). It never calls Instagram. On a Meta channel, the only thing that puts a message in front of the customer is a send tool — the Instagram tool in a Tool node, or the same tool attached to an Agent. A flow that ends in Direct Reply looks like it replied, and the customer receives nothing.
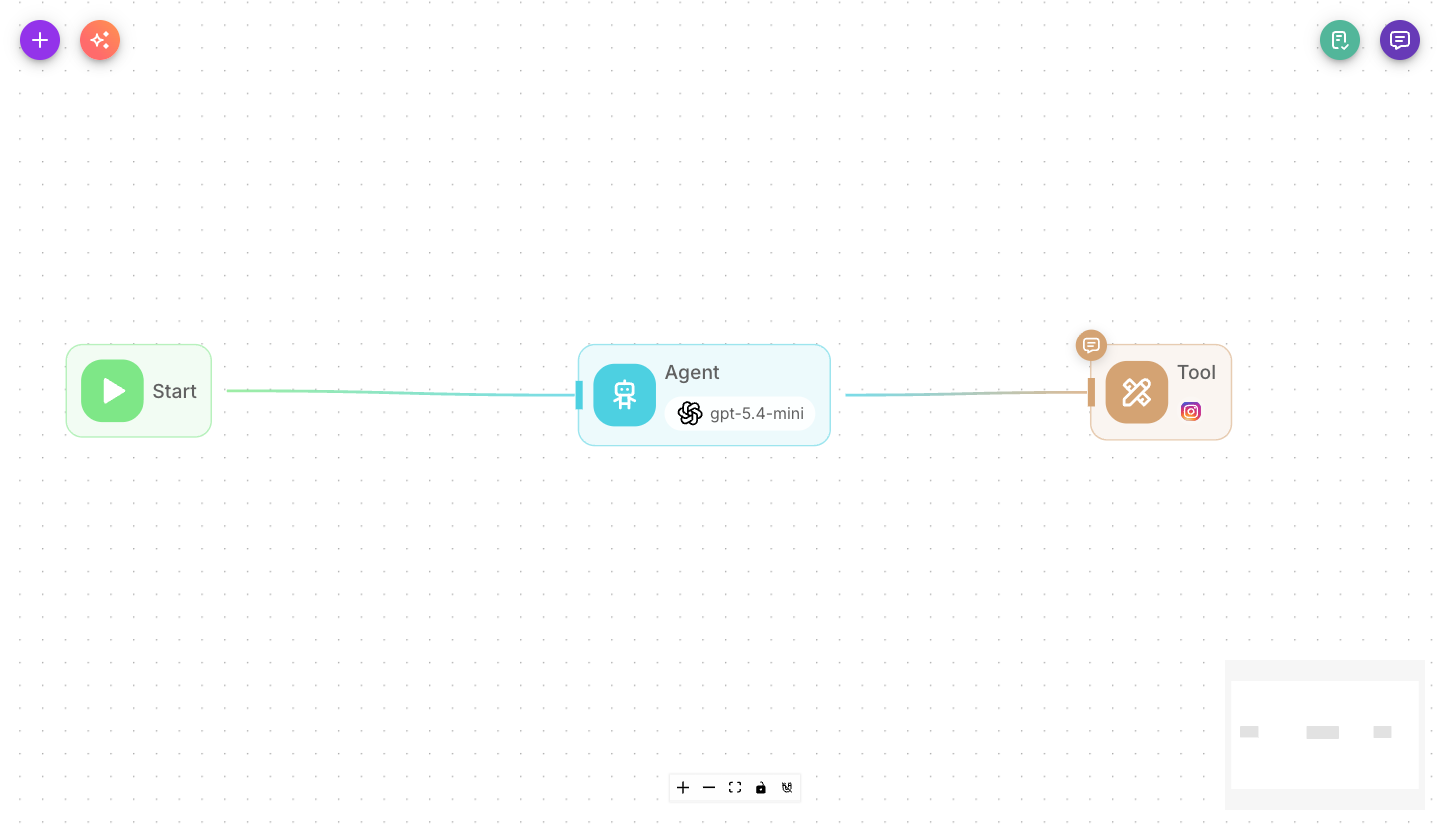
The finished flow is just three nodes:
The Tool node's output is the send receipt (a message id), which isn't interesting to an operator reading the thread. Turn Show Output in Chat off on the Tool node under Additional Parameters, and leave it on for the Agent so the transcript shows what the bot actually said. See Show output in chat.
Step 5 — Save and test
Save the flow. Then, from a different Instagram account, send a DM to your business account and watch the reply come back automatically.
You can review every conversation under View Messages.
Step 6 — Let humans take over
Sometimes a teammate needs to step in. When an operator replies to a thread directly from Instagram, Flowera automatically switches that conversation to manual mode so the bot stops auto-replying and doesn't talk over your team. When the operator is done, the conversation can return to the bot.
You can also branch on this inside the flow using {{$flow.manual.is_manual_mode}} — for example, skip the Agent entirely when a human is handling the thread. See Manual mode for the details.
What you learned
- An Instagram trigger on the Start node fires your flow on new DMs.
- The message arrives as
{{$question}}, alongside Instagram payload values like{{$webhook.instagram-dm.senderUsername}}. - The Instagram tool in a Tool node is what actually delivers the DM:
messageDMset to the Agent's node label,{{ Agent }}. Direct Reply would only write to the Flowera transcript. - Flowera flips to manual mode automatically when a human operator replies, so the bot yields.
Next steps
- Answer from a knowledge base instead of general knowledge: WhatsApp support bot (the Retriever pattern applies to any channel).
- Review and label conversations: View Messages and Session labels.
- Understand operator hand-off fully: Manual mode.